11 September 1297
The Battle of Stirling Bridge was fought on 11 September 1297, between the forces of William Wallace and Andrew Moray and an army composed of English, Welsh and Scots knights, bowmen and foot soldiers under the command of John de Warenne, 6th Earl of Surrey, and Hugh de Cressingham.
Stirling Bridge was Wallace's greatest victory, which was gained even though the Scots were less well equipped and far outnumbered, forces led by Wallace and Andrew Moray used clever military tactics to rout the English.
The Earl of Surrey proceeded north from Berwick with his army and confronted Wallace just outside Stirling on the River Forth.
Stirling Bridge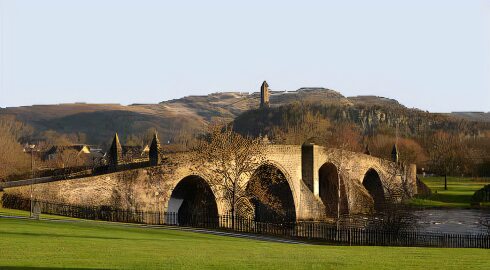
Surrey sent heralds to the Scots to persuade Wallace to disband his men, but was met with outright refusal, Wallacee is said to have sent the reply "Tell your commander that we are not here to make peace but to do battle, defend ourselves and liberate our kingdom. Let them come on, and we shall prove this in their very beards."
Surrey vastly underestimated his opponents, believing himself to be dealing with a disorganised rabble, he sent away a part of his troops when the treasurer complained of the cost, and then held up his own attack plan by oversleeping. The Scots army were encamped on the Abbey Craig, where the Wallace Monument stands today. Their army was predominantly infantry armed with long spears.
The Battle of Stirling Bridge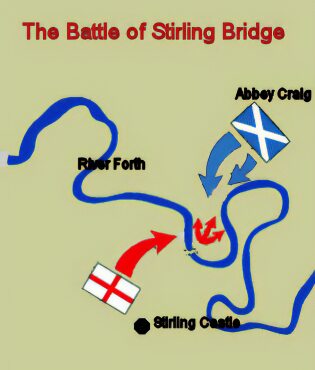
The small wooden bridge which then stood at Stirling was only broad enough to allow two horsemen to cross abreast. The Scots were deployed in a commanding position on the flat ground to the north of the river.
The English knights and infantry began to cross the bridge on the morning of 11 September, John de Warenne had previously ignored Richard Lundie who had advised against crossing the narrow bridge. He was advised to send a force of cavalry force upstream to The Ford of Drip, to cover the infantry's crossing, however, Edward I's treasurer, Hugh de Cressingham argued that too much of the king's money has already been wasted and insisted that they cross at once to bring the campaign to a swift end.
Led by Hugh de Cressingham, the English army, watched by Wallace and Moray, made their slow progress over the bridge and after which they had to enter a confined narrow loop in the River Forth, leaving their flank dangerously exposed to attack.
Seizing the moment, Wallace and Moray ordered their spearmen to attack. Cutting off any escape route back across the bridge, the Scots attacked the vulnerable English forces, who found themselves trapped.
Within an hour the Scots had slaughtered the trapped men. Some of the English knights managed to fight their way back across the bridge. A few foot soldiers swam to safety on the south bank of the river, the remainder were cut down.
Surrey set the bridge alight to cover the English retreat to Berwick, leaving the garrison at Stirling Castle isolated. The English chronicler Walter of Guisborough recorded the English losses in the battle as 100 cavalry and 5,000 infantry. Hugh de Cressingham was flayed alive by the Scots. It is said that Wallace had some of his skin fashioned into a belt for his sword. Andrew Moray was seriously wounded during the battle and died two months later.
Stirling Bridge, a shattering defeat for the English, destroyed the myth of English invincibility. The victory strengthened the will of the Scots to resist King Edward I, bringing new hope to a nation staring into the abyss.


The Battle of Largs PreviousNext The Battle of Falkirk